
Welcome to the world of woodworking safety, where the only splinters you should encounter are the ones you playfully sweep off the floor! In this crafty adventure, we dive into the nitty-gritty of keeping your digits intact while chiseling, sawing, and assembling your next masterpiece.
From essential personal protective equipment (PPE) that makes you look cooler than a lumberjack to handy tips on organizing your tools like a pro, we’ll cover everything you need to know to turn your woodworking passion into a safe and enjoyable hobby. So grab your goggles, and let’s get to work without becoming a cautionary tale!
Woodworking Safety Essentials
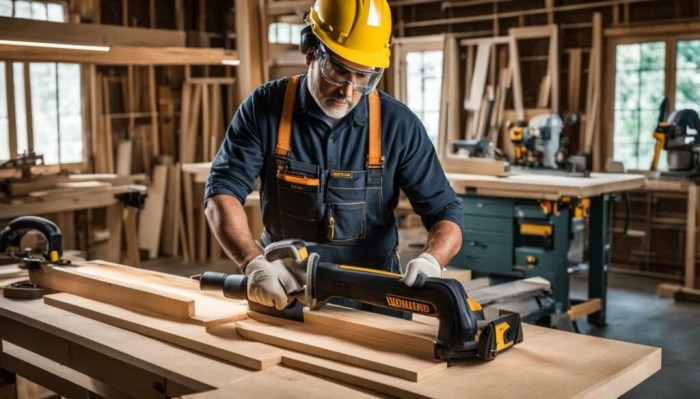
Safety in woodworking is not just about avoiding band-aids; it’s about ensuring you keep all ten fingers intact and your love for woodworking alive! While the sawdust may be an essential part of the craft, the safety gear you don is just as important. Let’s dive into the must-have personal protective equipment (PPE), best practices for storing tools, and how to maintain a workspace that even a perfectionist would envy!
Essential Personal Protective Equipment (PPE)
Woodworking can be as dangerous as playing tag with a porcupine. To keep yourself unpricked, certain PPE is essential. Here are the essentials that should never be missing from your woodworking arsenal:
- Safety Glasses: Protect those peepers from flying sawdust and wood shavings that love to make an uninvited appearance.
- Hearing Protection: The rhythmic roar of a table saw can make you feel like a rock star, but protect your ears with earmuffs or earplugs!
- Dust Masks: Prevent inhaling harmful particles. Bonus: you can channel your inner superhero by wearing a mask!
- Cut-Resistant Gloves: Keep those fingers safe while still maintaining a good grip. They are your best friends against sharp blades!
- Steel-Toed Boots: Because dropping a heavy object on your foot is not as fun as it sounds. Keep those toes safe!
Proper Storage and Handling of Woodworking Tools
Creating a masterpiece shouldn’t turn into a trip to the ER. Proper storage and handling of tools can prevent accidents and keep your workshop accident-free. Here’s how to handle your tools like a pro:
- Always return tools to their designated storage after use; a misplaced tool can lead to misplaced fingers.
- Keep sharp tools in protective sheaths or guards when not in use to avoid accidental encounters with unsuspecting body parts.
- Store power tools in a dry, clean environment to prevent rust—nobody wants a rusty saw in their life.
- Ensure that your tools are in good working condition. A dull blade is a dangerous blade; keep them sharp and ready!
- Label storage areas clearly so that your tools know exactly where they belong, just like your socks post-laundry day.
Maintaining a Clean and Organized Workspace
A cluttered workspace is like trying to find a needle in a haystack—dangerous and time-consuming. Keeping a clean and organized workshop enhances safety and efficiency. Here are the best practices:
- Regularly sweep or vacuum up dust and debris. An occasional dance party with a broom adds flair to your safety routine!
- Keep walkways clear to prevent trips and spills. Be a proud owner of a “no trip zone” workshop!
- Utilize storage bins and shelving for tools and materials. Bonus points for color-coding your materials to match your mood.
- Implement a “clean as you go” policy. Take five minutes after each project to tidy up and show your workspace some love.
- Consider using a pegboard for tools. It’s like giving them a wall to show off their best sides—very Instagrammable!
“Safety is not just a priority; it’s a way of life in woodworking.”
Safety Practices in Home Woodworking Projects
When it comes to woodworking at home, it’s not just about making beautiful furniture or crafting intricate decorations; it’s also about keeping all your fingers intact and your eyebrows firmly attached to your face! Woodworking can be a rewarding hobby, but it also comes with its fair share of hazards. Understanding and practicing safety measures is essential for every woodworker aiming to avoid a trip to the emergency room—or worse, a visit from your significant other with a “What happened to my kitchen table?” glare.Using safety guards and features on woodworking machines is not just a suggestion; it’s practically a superhero cape for your tools! These nifty devices are designed to protect you from the spinning blades and flying debris that could turn your DIY project into a horror movie.
Think of them as your tools’ version of a seatbelt—necessary for a safe ride!
Safety Guards and Features on Woodworking Machines
Safety guards are like the unsung heroes of your workshop. They stand watch, ensuring that you’re less likely to become a viral sensation for all the wrong reasons. Always make it a habit to check that safety features are in the “go” position before you begin any project. Here are a few reasons why these features are essential:
- Blade Guards: Many machines come equipped with blade guards to prevent accidental contact with the cutting edge. Make sure they’re properly positioned and functional before use.
- Emergency Switches: If your machine has an emergency stop switch, you should know where it is! Being able to stop the action quickly can save you from a close call.
- Push Sticks: Use push sticks for feeding material into machines. They keep your hands at a safe distance from the cutting area. It’s like a little wooden bodyguard for your fingers!
- Hearing and Eye Protection: Yes, wood can be loud and splintery! Always wear safety glasses and hearing protection, as those little wood chips have a knack for finding the most vulnerable spots.
Understanding the properties of the materials you’re working with is crucial for avoiding hazards, as not all woods are created equal. Some woods may be softer and easier to cut, while others can be dense and challenging to work with, which might lead to kickback or tool damage if not handled properly.
Checklist for Safe Operation of Power Tools
Below is a handy checklist to ensure your woodworking power tools operate safely. Remember, this is not just for you; it’s for your tools too—they want to be treated right!
- Inspect all tools before use for any damage or wear.
- Ensure that all safety guards are in place.
- Disconnect power when changing blades or bits.
- Keep the work area clean and free of clutter to avoid tripping hazards.
- Use the right tool for the job; don’t try to make a circular saw do the work of a jigsaw!
- Read the manufacturer’s instructions and safety warnings for each tool.
- Check that all cords are intact and grounded; frayed wires can turn a fun project into a shocking experience.
- Keep your hands clear of cutting paths; they shouldn’t be on the same journey as your saw blade!
Understanding material properties can also help you avoid hazards. Different woods have varying hardness, density, and moisture content, all of which can affect how they react to tools. For example, hardwoods like oak can be tough on blades and may require more patience and care, while softwoods like pine are easier to cut but can splinter if not handled properly.
Always remember: knowing your material is as vital as knowing where the first aid kit is hiding in the workshop!
Integrating Safety into Home Improvement Projects
When you’re diving into woodworking as part of your home improvement projects, safety should be your trusty sidekick, always ready to lend a hand—and a hard hat! The thrill of transforming your space can quickly turn into a horror show if safety isn’t prioritized. So, let’s ensure that your woodworking adventures stay fun and risk-free!Assessing risks when incorporating woodworking tasks into home projects is crucial for keeping everyone safe and sound.
Whether you’re crafting a new bookshelf or building a birdhouse, being aware of potential hazards is the first step in woodworking safety. The following methods can come in handy for evaluating risks effectively:
Methods for Risk Assessment
Before you start cutting, hammering, or gluing, take a moment to assess your workspace and the tasks ahead. Here are some practical methods to help identify potential risks:
- Conduct a Workspace Walkthrough: Take a leisurely stroll through your workspace, ideally with a cup of coffee in hand, to spot any hazards. Look for loose cords, unstable surfaces, or rogue pets that might want to “help” you with your project.
- Evaluate Tools: Inspect your tools for any signs of wear and tear. If your saw looks like it’s been through a zombie apocalypse, it might be time to retire it from its service.
- Consider the Project Scope: Bigger projects can mean bigger risks. Assess what you’re tackling and ensure you have the right tools and skills to navigate any challenges.
Educating family members about woodworking safety is just as vital as wearing your safety goggles while using power tools. Everyone should be on the same page when it comes to avoiding mishaps. Here are some fun and effective strategies for sharing safety knowledge at home:
Strategies for Educating Family on Safety
Safety education doesn’t have to be a snooze fest! Here are engaging strategies to get the whole family involved:
- Host a Safety Workshop: Turn it into a family event! Share safety protocols, teach proper tool handling, and maybe even throw in a mini-competition on who can wear safety gear the best.
- Create a Safety Book: Make a colorful, DIY safety manual that includes drawings, pictures, and fun facts. It could become a cherished family treasure while keeping everyone informed.
- Lead by Example: Show your family how it’s done. When they see you donning your safety goggles and gloves like a superhero, they’ll be more likely to follow suit.
Creating a designated woodworking area in your home is essential for maintaining safety and organization. This space should be a haven for creativity, not a chaotic mess where accidents lurk around every corner. Here’s how to set up a woodworking zone with safety in mind:
Designing a Safe Woodworking Area
Your woodworking space should be as inviting as a cozy café but equipped with all the safety features of a high-tech lab. Here are some key considerations for crafting your ideal zone:
- Location, Location, Location: Choose an area with good ventilation and ample space to maneuver. Avoid placing your workspace in a cramped corner where you might accidentally create a new “hole in the wall.”
- Organize Tools: Use labeled storage bins, pegboards, and tool racks. A tidy workspace is not just aesthetically pleasing; it also reduces the risk of misplacing tools or tripping over them like a clumsy lumberjack.
- Set Up Safety Stations: Create designated spots for safety gear, first aid kits, and fire extinguishers. Make it a habit to check these stations regularly—nothing says “safety first” like knowing where your fire extinguisher is during a woodworking project.
Last Point
In conclusion, woodworking safety is not just a list of rules; it’s a way to ensure that your creative juices flow without the fear of a rogue nail or an unexpected trip to the emergency room. By embracing good practices and a well-organized workspace, you empower yourself to create with confidence and flair. So, get out there, make some shavings, and turn your projects into triumphs—minus the drama!
FAQ Summary
What is the most important PPE for woodworking?
The most crucial PPE includes safety goggles, hearing protection, and dust masks to shield against flying debris and noise.
How should I store my woodworking tools?
Store tools in a clean, dry place, ideally in a designated toolbox or pegboard, to keep them organized and easily accessible.
What is a good way to educate family members about woodworking safety?
Hold a fun family workshop where everyone can learn about tool usage and safety practices while working on a small project together.
Why is it important to keep a clean workspace?
A clean workspace reduces the risk of accidents, makes it easier to find tools, and helps maintain focus on the task at hand!
How can I assess risks during a woodworking project?
Evaluate your tools, materials, and workspace layout, considering potential hazards and creating a plan to mitigate them before starting.


